July 24, 2016

Crimp Pliers – Not just for crimping beads

Make your own headpins using…crimp pliers! It is so fast and easy.
1. Paddle pin.
  • Use the back flat surface of the pliers to “squeeze” the end of wire.
  • If the paddle is not even, file it with an Emory board.
p1
p2

June 26, 2016

Bracelet Sizer


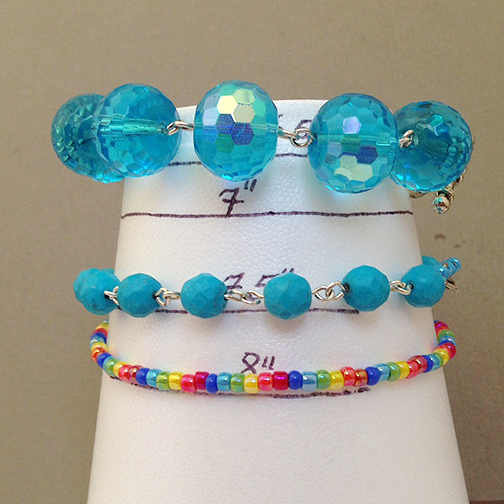
I made these three bracelets that are the same length (8”) but they fit differently because the size of the beads.
You can make your own bracelet sizer from Styrofoam cup.
First, I made templates with pieces of thread, one for each size.
Fold the thread in half; place a knot half size away from the fold. For example, for 7” size, place a knot 3 ½” away.
Turn the Styrofoam cup upside down and slide the thread templates on it. Mark the cup with sharpie marker tracing on the threads and write the size too.
 Slide your bracelets to determine the size (my blue large bead bracelet does not fit for this cup).
Helpful guidelines for bracelet sizes:
I work on the following rule for making my bracelets:
wrist measurement + 1 inch = bracelet size
Women's Sizes: 
Small: 6.5"
Average: 7"
Large: 7.5 – 8"
X-Large" 8.5+"
Men's Sizes:
Most Common: 8"
Average: 8-9" 
Ankle Bracelet (Anklets)
Most common: 9"
Average: 9-10"

April 15, 2016

Oval jump rings

Oval jump rings are a great alternative to round jump rings. These rings are ideal for connecting clasps, charms or beads to chains.
Need a mandrel to make your own oval jump rings? Use a set of two the same size knitting needles, wrap your wire around them.
  Carefully remove coil and cut evenly with sharp flush cutters (double- flush cutters work the best).
 

April 8, 2016

Measuring Template

If you’re making a piece of jewelry that requires multiples of one component, make all those matching components as close as possible to being the same size.
* Mark your round nose pliers with Sharpie marker to make the same size loops every time.
* Use a popsicle (craft) sticks as a template for measuring the wire for making ear-wires, S-clasp, head/eye pins, etc. Write down the wire measurements, wire gauge (I use a pencil to write, Sharpie marker can smear). Also, you can tape a sample or trace it. 
 

March 10, 2016

Spiral Post Earrings, Part 2 (using butane torch & LOS)

This lesson shows how to make a spiral post/stud earrings with balled end.
 Materials:
8” of 21 ga round half hard wire
Earring backs-2
 Tools:
 Flat nose pliers
 Round nose pliers

Wire cutters
Bench block
Ball peen hammer
Metal file 

Liver of sulfur (optional) 
Butane torch (optional)

March 8, 2016

Celtic Wig Jig Earrings

Here is another video how to make a beautiful pair of Celtic Wire Earrings using a Wig Jig.
The final product

March 4, 2016

Spiral Post Earrings - Part 1.

This lesson shows how to make a spiral post/stud earrings.
Materials:
• 8” of 21 ga round half hard wire
• Earring backs-2
 Tools:
 • Flat nose pliers
 • Round nose pliers
• Wire cutters
 • Bench block
• Ball peen hammer
• Metal file

February 28, 2016

Beaded Coral Tassel Tutorial


This lesson shows how to make beaded coral tassel. You can use this technique for making earrings, key-chain and bag charms. 
Materials:
Seed beads #11/0
Focal bead (or group of 2-3 large beads)
Beading thread
Lobster clasp (for bag charm)
Split ring (for keychain)
Ear hooks (for earrings) 
Tools:
Beading needle #12 
Scissors (or thread burner) 
Instruction below will show how to make a bag charm, but you can use this technique for making earrings as well.
Step 1: On a comfortable length of thread, pick up focal bead(s) and lobster clasp. Place this group in the middle of thread.
Step 2: Pass the thread back through the bead(s) skipping the clasp. Tighten.


Fancy Pyramid Pendant Tutorial


This tutorial shows how to make a 3D pyramid wire wrapped pendant.

Printer friendly- 6 pages, 33 steps

Materials and tools:
18ga round dead soft wire
26ga round dead soft wire
3mm round beads
Round nose pliers
Wire cutters
Chain nose pliers
Wig-Jig® Cyclops with pegs – optional
Extra optional: chains, beads, headpins

Tutorial is HERE