January 30, 2012

Ear Cuff

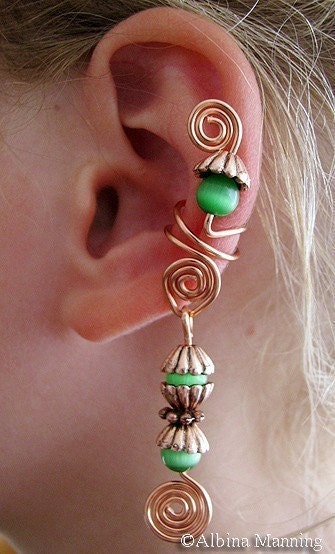
Ear cuff jewelry is great for folks who do not have pierced ears or who want the look of multiple piercings without having to have any additional ear piercings. An Ear Cuff clips to the cartilage at the edge of the ear.Ear cuffs are large and fit on the middle of the ear over the cartilage. Whether they are plain or with dangles, Ear cuffs go on the same way. 
Start at the top of the ear and slide down and push in over the cartilage. Then adjust them once, if needed so they barely fit over the cartilage at the middle of the ear. Just make sure they feel snug and secure...
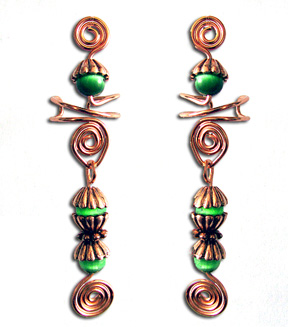
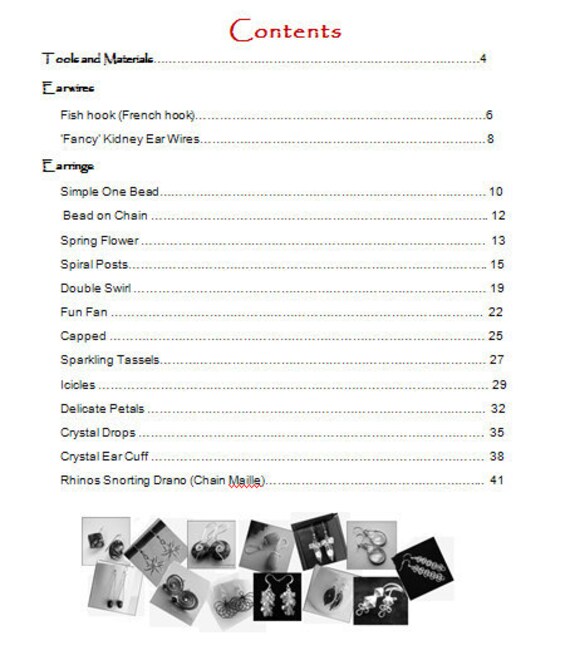
 This tutorial will show how to make an ear cuff with dangle.

Skill Level - Intermediate
Buy this tutorial HERE

January 27, 2012

Work with WigJig - Part 1

To make  my jewelry I use mostly three kinds of pliers: chain nose, round nose, and flat nose pliers. Sometimes they are just not enough to make some designs. I use a special tool - wire jig that  makes  my life a lot easier when I have an intricate design I need to replicate for earrings or a design that I need to repeat.
It can be  just like this pair of earrings that look like twins :)

January 25, 2012

Beaded Flowers

Once, my Russian friend living in Japan sent me a beautiful red beaded rose as a Christmas gift. I thought, "Is it possible to make something as lovely as Mother Nature creates? Probably not, but sometimes copies can be worth that of the original." That is when I fell in love with beads and wire.
Gerbera


If you want to make a French beaded brooch or just a flower, you can buy my step-by-step instructions  and you will be able to make this design with no difficulty.
This tutorial has two parts: French beading technique (5 pages) and Brooch itself (20 steps, 9 pages).
https://www.etsy.com/listing/55990321/ear-cuff-tutorial?ref=shop_home_active_15

January 24, 2012

Giveaway Results

Hello everyone, 
Are you excited to find out who won the Wire Wrapped Pendant Giveaway?
And the winner is... Tanya!
Her comment #6 was chosen as a winner by random.org generator:

Now, the prize is already packed and soon will be shipped. 
Congratulation on your win, Tanya!
Thank you for participation, everyone!

January 21, 2012

DIY: Wire Business Card Holder

 Having a home product party or going to art show to sell your stuff ? Show off your business information in your style.You will need only 40cm (16") of heavy gauge wire and a couple of pliers :)
Are you ready to make it all by yourself?

January 18, 2012

DIY Tutorial: Wrapped Ring

The other day my friend asked me to make a ring. I made it. And I made a DIY tutorial for it too:) I knew you would love it, right?

Tools and Materials
  • 20ga round dead soft wire – 2 ft
  • 10 mm bead – 1
  • Ring mandrel
  • Chain nose pliers
  • Wire cutters
  • Liver of sulfur (optional)

January 15, 2012

Sleeping Wire Tree

I think already told you that I started my wire art with making a beaded money tree. Since then I made dozens of beaded and gem trees. I always wanted to make a "pure wire" tree. And I did it finally :).
This sleeping tree wire sculpture was made with silver tone wire. I twisted and hammered each wire end then shaped whole tree with my hands. The tree is attached to the natural rock that I found at Bloody Basin, Arizona.

January 14, 2012

Book: Mixed Media Jewelry Techniques

This is an excellent book! Written for jewelry makers of all media and skill levels, this book encourages the mixing of techniques with the skills of others to create unique designs.
The book features 9 exciting projects combining various materials into new jewelry designs for necklaces, bracelets, earrings and more. Each project brings together two or three jewelry making techniques, each of which could also be used for independent projects.

The techniques include: wire-work, beading, chain maille, lampwork, beading, macrame, bead stitching, polymer clay, PMC.
https://www.etsy.com/listing/75865374/mixed-media-jewelry-techniques-book?ref=shop_home_active_8

Size:8 1/2" x 11". 80 pp. Soft cover
 Look inside:
Buy this book HERE

January 13, 2012

Beaded Tea Rose

The other day I was making a tea rose for my friend...beaded rose on wire of course :)


  I love making these little beauties. Only 8 petals, 6  sepals, stamen, and 10 leaves for 1 flower :)

DIY: Wrapped Rectangular Pendant

I have a habit of collecting beautiful, large gemstone beads. This is one of the ways I use wire to make a stylish pendant with them. 
Please notice that I use craft or florist wire to plan my design. When I am happy with the results, I create the finished item using a precious metal wire, in this case sterling silver. Although the following pattern uses a specific sized bead, by using my formula you can plan and make these pendants from about any size!
Materials for one pendant:
* 1 rectangular shaped gem bead, approx. 1 ¼”x 1 ¼
* 22ga round soft wire* with 1 foot of wire you can make 3 wraps around 1 ¼”x 1 ¼” bead.

Tools needed:
- Wire cutter
- Round nose pliers
- Flat nose pliers

 Formula: Wire: 1 foot for each desired 3 complete wraps around a bead + the length of the bead +2 inches

 1. Clean, straighten and then cut the 22g wire length needed. Measure and mark one inch from one end and use round nose pliers to make a simple loop (which will become the bail). Do not cut any wire!


2. After making the loop, bend the short end of the wire down at a 90° angle, so it lies next to the longer wire length. Insert this wire into the bead at the end you desire to be the top of the pendant.
**Note: If the bead hole is not big enough for both wires, make a wrapped loop instead of simple loop, trim the short tail and insert the wire into bead hole.
3. Leaving 1/8 inch of wire between the bottom of the loop and the top of the bead, bend the wire on the bottom toward what you choose to be the back of the bead/pendant.

4. From the bottom of the bead, on the back, measure up the bead 1/4 of the way and make a 90° angle in the wire, heading toward one side of the bead. Continue to wrap the wire around the entire bead, ending up again on the back.
5. On the back, thread the end of the wire under the first angle made, and carefully pull to tighten it around the bead. Measure up the bead to about the halfway point and make another 90° angle in the wire, heading it back toward the same side it just came around, beginning to "net"
6. Repeat the same procedure used in step 5, continuing to "net" the bead until you have reached the top of the bead, on the back. 
7. Bring the end of the wire to the top of the bead and use it to wrap around the top loop/bail, wrapping from the top of the bead up, toward and ending immediately under the loop/bail, and trim.
8. If you like the look of the straight wires going across the pendant, your piece is now finished. 
Front                                        Back
 9. However if you would like to add "waves" on the front of the pendant, place flat nose pliers on the wire where you desire, and give a slight twist. Repeat wherever you would like, always twisting in the same direction. 

I hope you enjoyed this tutorial.
  Please do not distribute, lend or copy. Do not mass produce.


See more tutorials at my shop here

January 12, 2012

eBook: Earrings for You


This is fully illustrated , easy to read 43 page instructional e-book how to create 13 different earrings with wire. This e-book also includes instructions how to make your own ear findings. Techniques used: wire wrapping, coiling, chain maille.
https://www.etsy.com/listing/83470024/earrings-for-you-e-book
Have a peek:
Fantastic bargain, loads of great pictures for guidancую Buy this e-Book HERE

Madagascar Carnelian Pendant

I bought a beautiful Madagascar carnelian nodule last year in Tucson/ It has a Drusy on one side. I just felt in love in this stone since I saw it! It is big and thick:  54mm x 28mm x 20mm! I wanted to make a pendant out of it . Since it is so thick (20mm) and it has an irregular  thickness, I decided to "cage" it and show drusy through the net. I think I did it!
I added little "curls with agate beads for dramatic look.

January 11, 2012

DIY: Beaded Jump Ring

Did you try to slide a nice big bead on a jump ring and it did not "want" to go there? Today I want to show you how make jump rings with gemstone, or any “beads” on them. In other words, you will be able to create fancy jump rings, which can be used as connectors in a variety of projects.
 Materials:
·  Wire 22ga or thicker (it has to fit bead’s hole), round, half hard
·  Gem beads 3mm, or seed beads size 6°or 8°, or gem chips

Tools:

·  Chain nose pliers
·  Flash wire cutters

DIY: How to Make Bead Spinner

A bead spinner is not required tool, but if you string many seed bead strands you may find this simple spindle tool a reason to celebrate! 
And you do not have to spend $15-$65. You only need one wooden chopstick and small plastic jar(container). I used one from apple sauce, and it holds up to 100 grams of beads!

Tucson Jewelry Classes

I wanted to let you know that you can find me in Tucson this winter! I'll be available to teach classes at Tucson Electric Park/Kino Sports Complex at JewelryTools' Tool Tent, #ES14.
You can see all the classes and days I'm teaching here: http://www.jewelrytools.com/classes/albina-manning /

Classes start at just $99 and will be held January 28-February 12, 2012

You can find directions to Tucson Electric Park here: http://www.jewelrytools.com/classes/tucson2012-directions

Hope to see you there!