The other day my friend asked me to make a ring. I made it. And I made a DIY tutorial for it too:) I knew you would love it, right?
Tools and Materials:
 |
1. Cut a piece of 20ga round dead soft wire2 ft (61cm) long.
2. Place a 10 mm round bead in the middle of the wire. Bend the wire down as shown.
|
 |
| 3. Place the wire with a bead around the ring mandrel mandrel at ½ size larger than needed. Wrap the wire around the ring. There is one wire on either side of a bead. |
 |
4. Wrap each wire around the bead, one side at a time and alternate sides. Your wires will end up in opposite directions.
|
 |
| 5. Continue wrapping until you are satisfied with number of wraps or you have at least 1” of wire left on each side. |
 |
| 6. Take the ring from the mandrel. |
 |
7. Use the wire end to wrap around the shank. Make 2-3 wraps. Cut the wire. Tack the wire ends with chain nose pliers so they are not poking.
|
 |
| 8. Repeat step 7 with another wire end. |
 | |
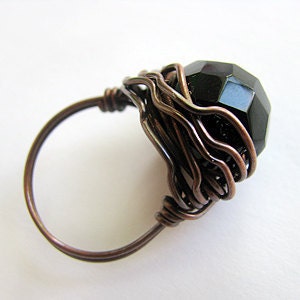
| Using bend nose (or chain nose) pliers, twist slightly some wires as shown. |
 |
| You may want to oxidize your ring as well. |
Play with different size and color of the bead and wire, and you will always have a different ring :)

Please do not distribute or copy.
See more tutorials at my Etsy shop
If you want to buy this rings click here.
I LOVE this tutorial, thank you for being so detailed! I am headed to hobby lobby now to get all the things I need to make myself my own handcrafted ring! I LOVE me some chuncky, interesting jewlery, especially rings! Thanks for the ideas!
ReplyDeletewhat a cute idea! So simple, yet so pretty, I love how you bend the wires after you've wrapped them around the bead, it makes it look much nicer, and more "raw" if you know what I mean. :)
ReplyDeleteThanks for sharing!
www.thecreativemuslimah.blogspot.com
I have see once, tutorial of business card stand the person using same wire for making simple card stand i m sure you can also do it well.
ReplyDeleteGift Card printing
Scratch Cards
Plastic Business Cards
Thank you so much for giving us a vey unique and comprehensive tutorial. I wish to feature this someday on our blog as well.
ReplyDeleteDiybeadingclub.com
Diylessons.org
Handmade-Jewelry-Club.com
very nice, clear, short and easy the way I like it www.byhookandwire.com
ReplyDeletethank you
Hi Albina :) It is inspiring to see how one simple tutorial can be a lot of help. Just had to share this on my blog so my readers can learn too from your tutorial. Nice job! You might like to read the article at http://www.handmade-jewelry-club.com/2012/10/diy-wire-ring-jewelry-tutorials.html
ReplyDeleteCheers!