When you start working with wire, you need tools. Often, I am asked, "What tools do I need for wire-wrapping?" There is a huge range of jewelry tools available. I would say you need four tools for sure :) But...The more you work, the more tools you have, believe me.
So, let's look at some tools.
Pliers.
1 - Chain nose pliers have tapered tips, smooth jaws and slightly rounded edges for shaping and bending. They are very useful for opening and closing jump rings.
2 - Wire cutters are for cutting wire and headpins. To cut memory wire use special memory wire shears!
3 - Nylon jaw pliers have plastic jaws. These pliers really useful for straightening wire. Hold one end of the wire between the jaws of a pair of flat nose pliers in your non dominant hand and hold the nylon nose pliers in your other hand. Place the nylon nose pliers on the wire, next to the flat nose pliers, then draw the pliers along the wire to remove any kinks and to straighten it. Notice: the more you straighten the wire, the harder it becomes!
4 - Flat nose pliers designed for making sharp bends and right angles in wire. Flat nose pliers can also grip flat objects and work well for straightening bent wire.
5 - Round nose pliers have tapered, conical jaws for making round wire loops and curves. Use them to round ends of memory wire or to loop wire for beading and wire wrapping designs. If you want to make consistent sized loops, mark the pliers with a permanent marker so that you always place your wire in the same place.
6,7 - Bail making pliers have round, barrel-shaped jaws that help you create the perfect bail for any sized pendant.
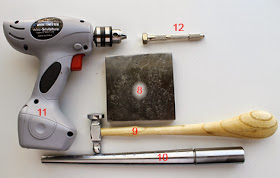
Also, I have another extra tools that I use in my wire work.
8 - Steel bench block won't go anywhere as you work to texture, flatten and shape your metal pieces. Use this block for your metal stamping work too!
9 - Chasing hammer has a large face for flattening and a ball-peen side for riveting and metal design. If the head of a Chasing Hammer is totally flat, then you will mar your wire if the edge of the hammer happens to hit it. If it is too convex, there is only a small striking area in the middle. Choose a hammer that is only slightly convex.
10 - Steel Ring mandrel for forming and shaping rings sizes 1-15. Unlike plastic ring mandrels, you can use this solid metal mandrel for hammering metal. Form rings directly on mandrel!
11 - Automatic Wire twister. Twist almost any size wire at twice the speed! Also, I use the twister to coil the wire! Just love it!
12 - Pin vise for twisting short-to medium-length wires.
What's your favorite jewelry making tool?


